
A rear derailleur hanger is the small tab of metal that connects your rear derailleur to your frame. It is designed to be the weak link so that it breaks first and saves other more expensive parts from failure. Almost all hangers are specific to the model of bike you are riding and even vary year to year. It is a good idea to have a spare one on hand instead of trying to track one down when you really need it (like the night before a race).
It’s not too often that I don’t feel the need to check the alignment of a rear derailleur hanger. It is also a rare occurrence that a hanger doesn't need aligning, they are almost always out of spec. Even brand new hangers purchased to replace bent old ones frequently will not match up perfectly with the frame and will need aligning.
Most of the time it is not visible to the eye if a hanger is bent or not. Telltale symptoms of a misaligned hanger - the rear derailleur will shift fine at one end of the cassette but will lose it’s ability to shift and hold a gear as it moves from one side of the gear cluster to the other. If your hanger is way out of whack your derailleur will appear to be pitched on a sideways angle as you eyeball it from the back of the bike.
No matter how fancy you get with your other adjustments, your rear shifting will never function normally unless you have an aligned hanger. That is why performing this alignment is usually one of the first tasks I do when adjusting a rear derailleur. There is no point in fine tuning all of the other adjustments only to have to do it all over again once the hanger is shifted into alignment.
Tools needed:
-5mm Allen key
-Hanger alignment tool
Now I know what most of you are thinking………. “I don’t have a hanger alignment tool!?” Well no you probably don’t. I do really think these are one of the most important tools you can own. I bought one right away as soon as I decided I was going to be working on other peoples bikes as well as my own a little more seriously. These tools are well made and durable and will last a lifetime. The updated tool (as pictured) accommodates most of the bikes on the market. This Park Tool hanger alignment tool retails for about $100.
Or you can take it to your shop. It is about a 5 minute job and should cost <$10.
Now this job is really easy to do. It should take you 5 minutes or less after you've done it a couple times
 Step 1: Always make sure your rear wheel is centred in the dropouts. I always do this with the bike on the ground. Stand on the opposite side of the quick release lever, lean over the bike putting weight on the saddle to push the wheel square into the frame and close/tighten the quick release lever. No point in adjusting a derailleur to perfection only to find the wheel was crooked in the frame sending you back to square one (it happens to us all).
 Step 2: Now with your bike in the stand (or flipped upside-down a la poor mans work stand) shift your rear derailleur all the way down to your smallest cog on the back. This relieves a lot of the tension on a chain/rear derailleur and makes it easier to work with.
 Step 3: Use your 5mm Allen key and make sure it is securely fit into the B-axle bolt on the rear derailleur. Sometimes derailleurs are torqued on there really tight so taking the extra 2 seconds to ensure a secure fit with your 5mm helps prevent any bolt rounding/cursing/hacksawing of frames. Break the bolt free then proceed directly to Step 4. Do not pass GO at this time.
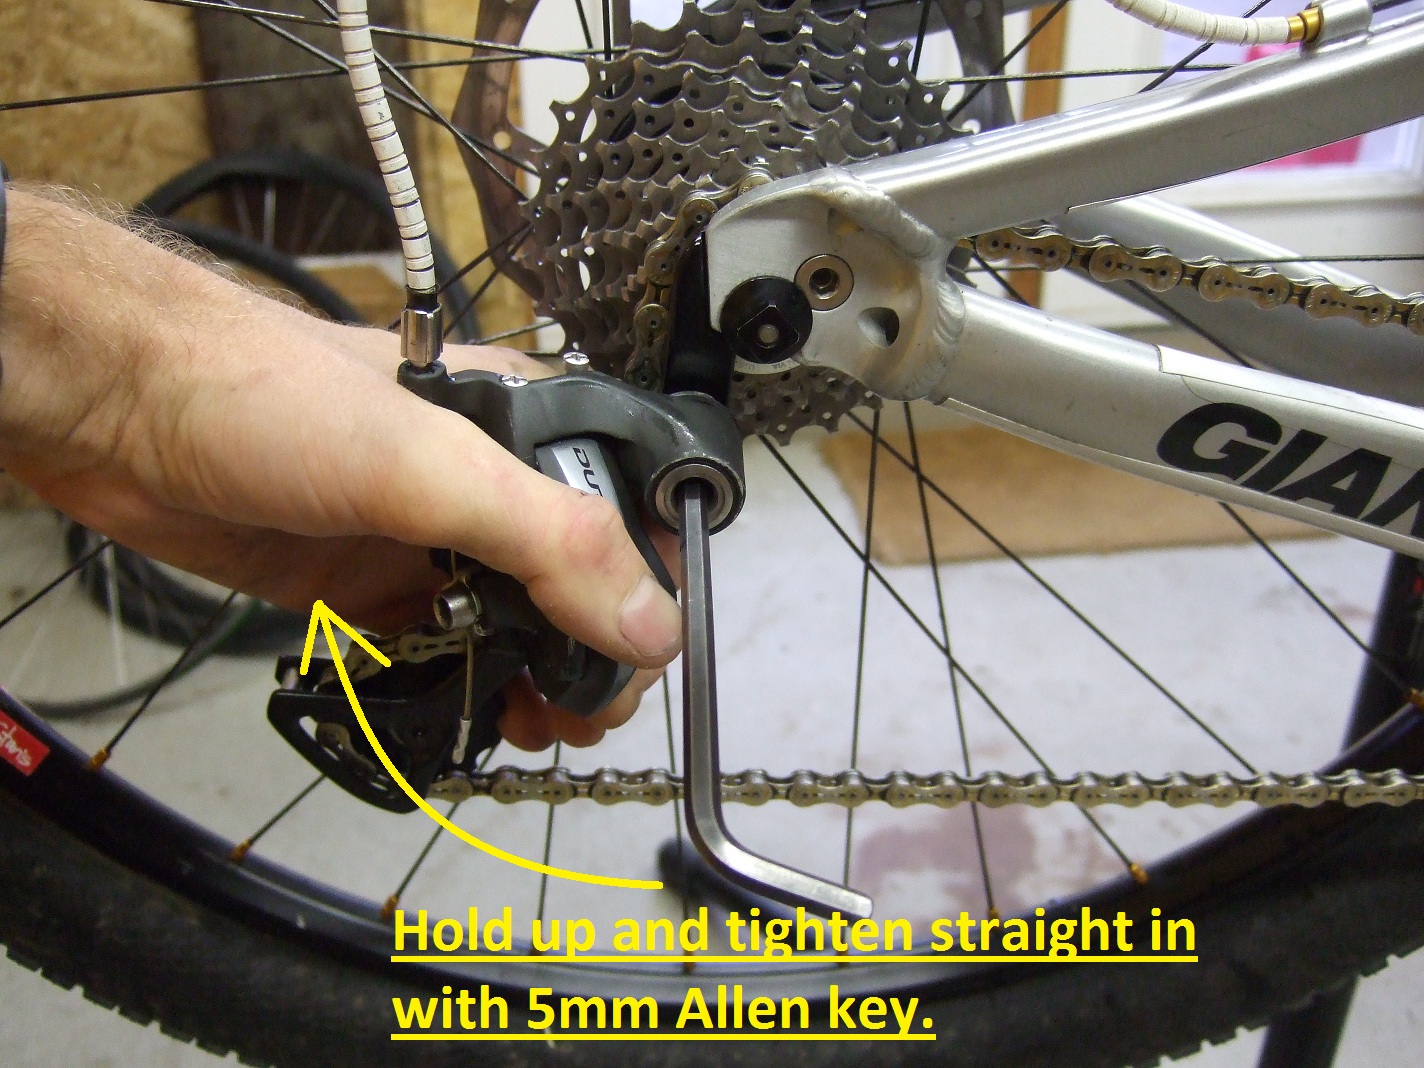
 Step 4: This step is pretty important for protecting your hanger. It is made of soft aluminum (remember it is designed to break first) and the threads are also easy to strip out (commence cursing, and dremeling, and opening of wallet). By grasping the entire rear derailleur in one hand, rotate it clockwise so that it is floating free of your frame. When it is floating free you will be able to loosen the B-axle bolt quite easily with your other hand while guiding the derailleur straight back towards you as not to damage the final few threads of the hanger on derailleur removal.
 Step 5: Now that you've loosened it all the way out, just let the derailleur sit out of the way of the hanger.
  Step 6: Wipe the crud off your hanger so you have a nice clean surface to attach your hanger tool.
Ohh clean
 Step 7: Carefully screw your hanger tool into place. Don’t cross thread. Your hanger tool is steel and your bike hanger is aluminum. Your hanger will lose and you will have to buy a new one.
 Step 8: Now that your hanger tool is installed it is time to adjust it for use. Always make sure the set screw is snug to eliminate any wobble in the tool. Then line up the hanger tool arm with your wheel valve stem and adjust it to within a few mm’s of your rim. The reason we use the valve stem is because you want to reference the same spot on your wheel since the entire wheel might not be perfectly true.
Line it up with the valve stem

Step 9: Now you can actually align the hanger. How this is done is by making sure it lies on a parallel plane to the wheel. Rotate the tool clockwise around at the same time you spin the wheel. Keep the alignment arm right by the valve stem and make sure there is an even gap between the arm and the rim as your rotate around.
You’ll only be able to rotate so far before the frame gets in the way but you’ll be able to align it ¾ of the way around the wheel which will inevitably result in the hanger being aligned for the ¼ of rotation that is blocked by the frame.
*Don’t drop the hanger tool onto your seat stay, it is a heavy tool and your bike is a delicate flower.
If there is not an even gap between your hanger tool and rim then you need to push or pull the tool to bend the hanger into alignment. Remember if there is no gap at the bottom of the wheel and a 5cm gap at the top then just bend it in 2.5cm at the top and it will bring the bottom out the other 2.5cm. Always rotate the wheel clockwise so that it can freewheel and you don’t have to bother with the chain moving around.
*Note* Aluminum doesn't like to bend. If a hanger is out of whack by a lot then there is a chance you will break it by trying to align it. There is very little danger of damage to the hanger if it is only off by a little bit.

Keep manipulating your hanger by bending it with the tool until there is an even gap as your rotate the tool and wheel all the way around. Take your time.


Step 10: That’s it, your hanger is aligned. Unscrew your hanger tool from the rear derailleur hanger. Now you can carefully begin installing your rear derailleur back into the dropout. Again grasp it so it can go straight in.
The reason we rotate the derailleur clockwise in our hand is so that the B-tension adjustment screw will clear the tab on the derailleur hanger that it eventually rests against. Tighten the 5mm B-axle bolt until the derailleur snugs up against the derailleur hanger and then loosen it ½ a turn. Release your grip on the derailleur and allow it to rotate counter clockwise back down into place.
Torque the B-axle bolt to its final tightness. Be firm but not ridiculous, 7 out of 10 on the perceived exertion scale
We rotate the derailleur so that this screw will clear the hanger as you screw the derailleur back onto the bike

Before you torque it down make sure this screw (B-tension screw) rests directly against the hanger. Or in the case of a Shadow rear derailleur, make sure the plate on the derailleur is oriented in such a way that the metal tab rests against the stopper on your frames derailleur hanger. (I will illustrate this later)

That’s it you’re done! Go forth and adjust the rest of thine derailleur knowing thou hanger hast been purified.

Benno
Hi is there any chance you could illustrate this please.
ReplyDelete'in the case of a Shadow rear derailleur, make sure the plate on the derailleur is oriented in such a way that the metal tab rests against the stopper on your frames derailleur hanger.'
Well done. Good use of words, It was not one of those dry technical explanations. Well done mighty bike mechanic.
ReplyDeleteGreat clear explaination!
ReplyDeleteThanks!
Thank you very much indeed. I think I will probably get a hanger from aliexpress or perhaps use a spare rear wheel as a tool. It is not obviously bent.
ReplyDeleteI had no idea what a Shadow derailleur was either. Here is Shimano's explanation
ReplyDeletehttps://bike.shimano.com/en-EU/technologies/component/details/shimano-shadow-rd.html
Pretty much all modern derailleurs now mount the "shadow" way. As mentioned even a brand new hanger could be out of alignment so if you install a new one and your shifting is still off then you either need to buy the alignment tool, take the bike to a mechanic, or build an alignment tool if you are super handy. - Benno
DeleteThanks very much indeed again. The hanger was bent. I used a spare rear wheel, screwing that onto the hanger and it was bent in bottom and front. It also seems that the bike (2007 Trek Madone 5.2) has integrated, irreplaceable hangers. I can now change to all my gears.
Delete